Let’s begin with a small question – where exactly was this photo taken?

One of the most common ways to identify the location of a photograph is to search via Google or TinEye. As long as we have the name of the object, we are able to name the location. Such methods are not always sufficient, and so there are other ways as well. For example, exploring information that isn’t visible in the picture.
Each image file contains a range of additional information, called “metadata,” which is stored within a file. Images come with basic metadata, as well as information about the device (the EXIF data) with which it was taken.
Among other information, in metadata you can find:
- Date and time of the original
- Geo-location data
- The model of camera and its settings (exposure time, aperture value etc.)
- Copyright information
This may help us to check two aspects. First, it helps to find out where and when a photo was taken. Second, whether the photo was edited, and if so, how.
Geo-location data (if there is any) is useful for identifying an accurate location. However, the availability of such data depends on a few factors. Firstly, it depends on the device with which the photo was taken. Some cameras or mobile devices may not have a GPS sensor to trace coordinates. Secondly, users might disable the geo-location feature on their devices in order to keep their privacy or to use the battery- saving mode. And finally, it depends on the server on which a photo was published. Social network sites such as Facebook, Twitter, or Instagram delete metadata from a photo the moment of uploading. Nonetheless, those sites could use location data directly from the GPS-sensor if the mobile device of the owner allows the use of such data.
Checking EXIF data availability couldn’t be easier. One way is to download the file of a photo, then right click on it and open “Properties.” In the “Details” tab there will be all existing metadata. However, special online services for metadata analysis would be more time-saving. Jeffrey’s Exif Viewer is one such service. Written and published by a Japan-based American programmer, the service analyzes and presents all the available information from the metadata.
Let’s take the photo from the beginning of the text as an example. By uploading the photo on the Viewer, we find out that it was taken with an iPad on October 6, 2013, at 4:59 pm. As the link to the photo wasn’t from Facebook or Twitter servers, location data is also available. What’s most useful with Jeffrey’s Exif Viewer is the display of such data on Google Maps directly. This is how we know, not only that the photo was taken in the city of Brno (Czech Republic), but also from what approximate direction. This might be helpful while verifying information about some particular object and how it is situated in a landscape.
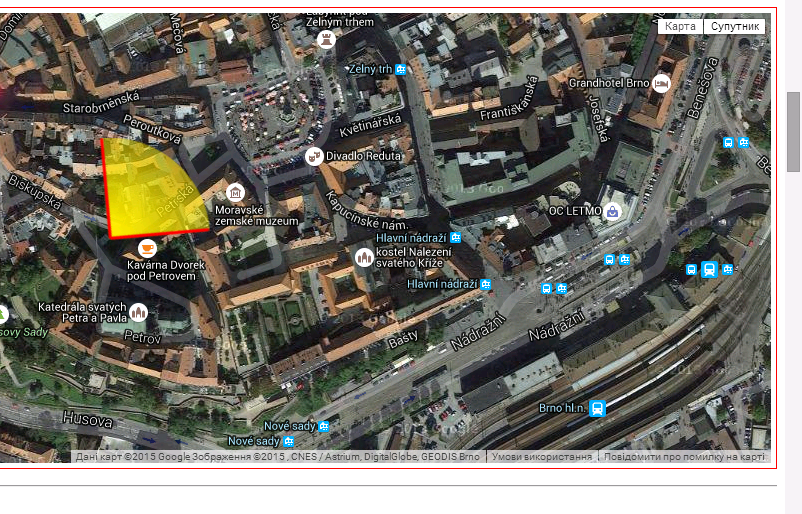
Location coordinates from EXIF data on the of the city of Brno
The other similar service for checking metadata – FindEXIF.com – works in the same way, but only with links. No upload option is available.
To find a picture of a particular place may also be possible with the Panoramio service. This photo-hosting site uses EXIF data to place all the uploaded photos on the map in the exact location. Having a significant image database, Panoramio, however, contains more landscape than event photos.
Another important piece of information that might be pulled out from a metadata is about how a picture was edited. The Fotoforensics service seems to be the most useful here. A photo can be uploaded directly to the service, or a link option is available as well. First of all, FotoForensics shows the original and last modification date. But it also offers the ELA (Error Level Analysis) option. This is like a scanner that shows how the picture was manipulated, even though those changes aren’t visible at first glance. While having basic knowledge of how it works, it is possible to identify the scale and type of manipulation, such as photo montage, for example.
There are many recommendation materials and sample tasks about comprehensive photo analysis on the web. Here we name just a few of them:
– the same color areas under ELA should also be in similar brightness. If under ELA some area of the image is brighter than the other, it was possibly edited;
– each re-saving of a JPEG file compresses it with lower quality. On the hardly compressed image noise should be visible;
– an area that was placed from another image under ELA would be brighter than other areas. But brighter doesn’t necessarily mean edited, as sharpened areas also leave such traces (text, line, edge);
– photo editors such as Abode leave a rainbow trace on an image. These traces aren’t necessarily evidence of photomontage. It is enough to re-save an image with Abobe software to leave such traces.

Fake image of Hurricane Sandy. Snapshot from the film “Day after Tomorrow” placed in TV broadcasting title
Not every photo, especially from social network sites, contains metadata with a date, author, and location. That would be too easy. But it is important to remember that verification of user-generated content is always a process of gathering information from different resources. The more tools you use during such a process the broader understanding you get.
For instance, there is another service for identifying image manipulation – Picture Manipulation Inspector – from Russia-based SMTDP Tech. Similar to FotoForensics this service analyzes a pixel structure of an image (demo version is available). In November 2014, SMTDP Tech representatives tried to verify a fake image allegedly demonstrating the moment of missile attack on Malaysian Airlines Flight MH17. The picture became widely known after it was broadcast on the state-owned Russian First TV Channel. Specialists couldn’t manage to identify the manipulation from the technical perspective due to the low quality of the image. However, the fake origin of the photo was possible to confirm via other method.
If you know other methods or tools for verifying image manipulation, please share them with other readers in the comments section.
By Taras Nazaruk, for Stopfake.org.


